Foliage Vertex Painter - How it works
This page explains each UI section of the opacity cutout and its functions.
Overview
This is the overview of the foliage vertex painter, below we will go over each section and what it does.
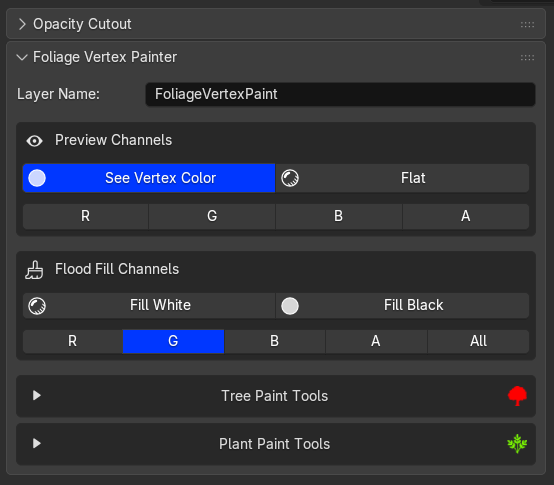
Layer name and Preview Channels
The first section of the plugin is about setting up a layer name for your paint layers, by default it is set to FoliageVertexPaint. You can ofcourse input your name.
See Vertex Color
When clicking the button it Switches the viewport to see the vertex color, clicking the button again will disable it.
Flat
Same as above but uses Flat lighting. Flat removes all directional shading/shadows, so the vertex color values read as pure greyscale values with no lighting influence. This is more accurate for inspecting the actual painted values, what you see is exactly the number stored in the channel.
Pro Tip
This is the recommended view to properly inspect your values.
R / G / B / A channel buttons
These isolate a single channel for preview. When you click R for example, it creates a temporary greyscale layer (VertexPreview) that copies the Red channel values into all three RGB slots (R=val, G=val, B=val), then sets that as the active color attribute. The viewport then shows only the Red channel as a greyscale image. Clicking the same button again resets to ALL, it removes the preview layer and restores the real FoliageVertexPaint layer.
In short:
See Vertex Color / Flat are viewport display toggles, and R/G/B/A let you inspect one channel at a time as a greyscale rather than seeing the full combined RGBA colour which is harder to read.
Tree Paint Tools
Here we go over the tree vertex paint tools
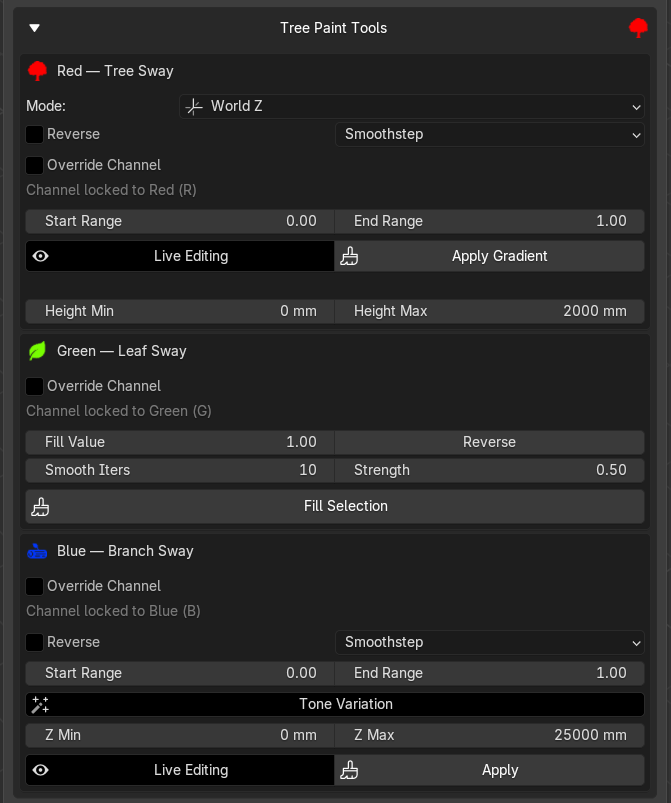
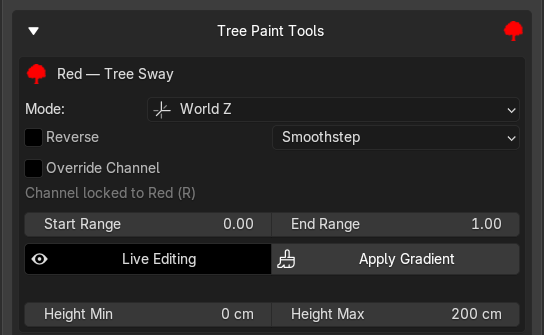
Red Channel - Tree Sway
Lets start with the red channel
Override Channel
By default the gradient is locked to Red (R) since that's the Tree Sway channel convention. Enabling this lets you redirect the output to G, B, or A if needed.
Mode How the 0→1 gradient is projected onto the mesh:
- World Z, uses absolute world-space height. Black at the bottom of the scene, white at the top. The gradient spans the actual height of the object in the world.
- Object Z, same idea but uses the object's local Z axis.
- BBox Longest, finds whichever axis of the bounding box is longest and projects along that.
- UV V, uses the V coordinate of the active UV map as the gradient value.
- UV U, same but uses the horizontal U coordinate instead.
Reverse
Flips the direction of the gradient.
Curve (Smoothstep etc.)
Shapes how the gradient transitions between 0 and 1:
- Linear, perfectly even ramp, no easing
- Smoothstep, default, eases in and out so the transition feels more natural (Default)
- Smootherstep, stronger version of the above, very soft at both ends
- Ease In, slow start from the base, accelerates toward the tip
- Ease Out, fast from the base, decelerates at the tip
Start Range / End Range
Clamps the output values. Default is 0.0 → 1.0 (full black to full white). If you set Start Range to 0.3, the darkest part of the mesh will be 30% grey rather than black, useful when your Unreal material needs a minimum wind value at the trunk.
Live Editing and Apply Gradient

Each sway section has two ways to write the paint:
Live Editing, when enabled, every change to any setting (mode, range, curve, height band) immediately repaints the vertex color layer. The viewport switches to vertex color display automatically so you can see the result as you adjust.
Apply Gradient, manually triggers the paint once. When Live Editing is off, this is the only way to write the data and is required. When Live Editing is already on, Apply just re-runs the same paint that is already there, it has no additional effect unless you switched Live Editing off mid-tweak and changed a setting afterward.
Typical workflow: enable Live Editing, adjust until the gradient looks right, then disable it. The data is written during the live edit.
Pro Tip
This means you don't have to click apply gradient.
Height Min / Height Max
A world-Z mask that restricts where the gradient takes effect. Could be useful for suppressing wind at the very base of a trunk where it meets the ground.
Override Channel
By default the gradient is locked to Red (G) since that's the Tree Sway channel convention. Enabling this lets you redirect the output to R, B, or A if needed.
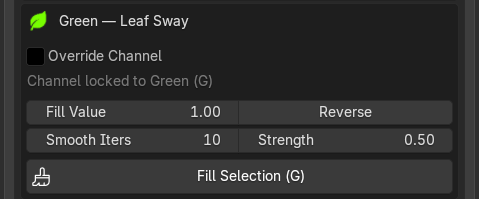
Green Channel - Leaf Sway
This channel is intended for use on tree canopies, controlling the movement of leaves and smaller foliage.
Fill Value
Fill Value controls what value gets written to your selected faces, and the inverse goes to everything else.
The intended workflow is based on how a leaf connects to a stem:
The Petiole is the short stalk where the leaf attaches to the branch. This point should be black (0),it's the anchor, it doesn't move. The leaf body and tip should be white (1),maximum wind flutter away from the anchor.
Select the leaf body or if the Petiole is selected use reverse. The leaf body gets 1.0, everything else (petiole) gets 0.0. This is a gradient from black to white.

Smooth Iters / Strength
After painting the hard selection boundary, a smoothing pass runs to blend the sharp edge between selected and unselected values. Every vertex averages with its neighbours, repeated for the number of iterations.
Smooth Iterations, how many passes of averaging to run. 0 = no smoothing, sharp edge at the selection boundary. Higher = softer transition. Strength, how much each iteration pulls toward the neighbour average. 0.0 = no effect, 1.0 = fully replace with neighbour average each pass. Useful when leaf islands are close together and a hard value jump would look unnatural in the wind simulation.
Fill Selection
Executes the paint, writes the fill value to selected faces and the inverse to unselected, then runs the smooth passes. Works in both Edit Mode (uses face selection) and Object Mode (uses stored selection).
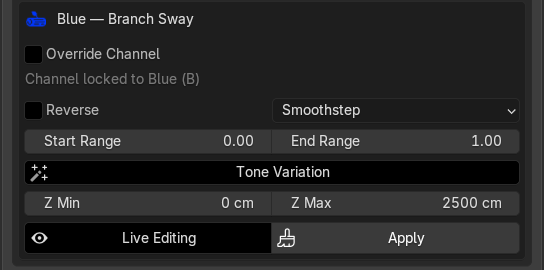
Blue Channel - Tree Sway
Reverse
Flips the gradient direction within each branch, dark at the tip instead of the base, bright at the base instead of the tip.
Curve (Smoothstep etc.)
Same easing options as Tree Sway, shapes how the gradient transitions from dark to bright within each branch island. Smoothstep is the default.
Start Range / End Range
Clamps the output values for the gradient within each island. Default 0→1. Narrowing this (e.g. 0.2→0.8) prevents any branch from being fully black or fully white, which can help keep wind variation subtle.
Tone Variation
This is the key feature of the branch channel. Each UV island (branch) gets a random brightness multiplier applied on top of its gradient. The result is that every branch ends up at a different overall brightness level, so in Unreal each branch has a different wind phase and amplitude, this way they are not perfectly synced, creating a more natural effect.
Without the value variation, all branches would have the same gradient range and move together. With it, one branch might peak at 0.8, another at 0.5, another at 0.3, all randomised by the seed.
Good to know
The random scale per island is in the range 0.3–1.0, so no branch ever goes completely dark.
Seed
Changes which random arrangement value variation produces.
Z Min / Z Max
A world-Z fade mask applied on top of everything else. Vertices below Z Min receive 0 (no sway), vertices above Z Max receive the full computed value, and anything between fades smoothly. Useful for suppressing branch sway at the base of a tree where branches meet the trunk.
Live Editing and Apply Gradient
Same behaviour as Tree Sway, Live Editing repaints on every setting change.
Plant Paint Tools
Here we go over the plant vertex paint tools, these tools are similar to the tree vertex paint tools.
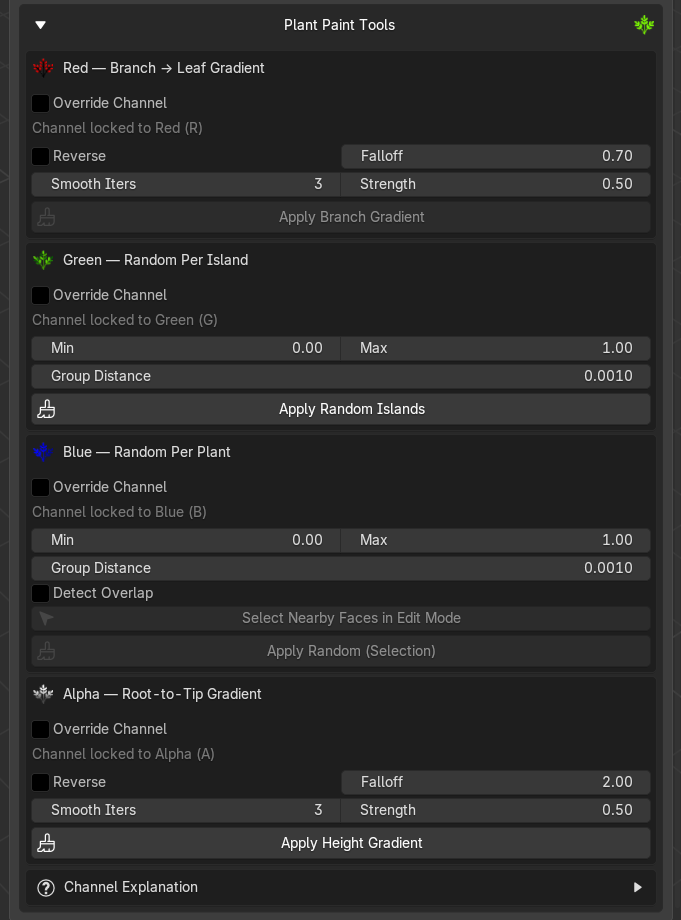
Red Channel - Stem to Leaf Gradient
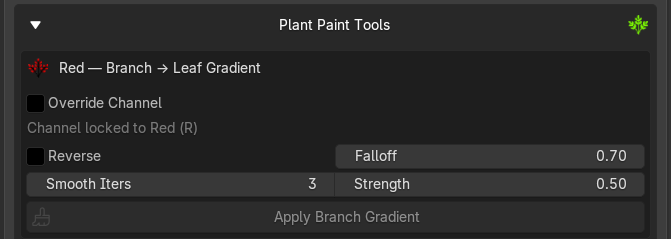
Paints a gradient from your selected vertices outward across the mesh. Selected = black (0), everything far away = white (1). This tells the wind shader which parts are stems (anchored, black) and which parts are leaves or tips (free to move, white).
Requires Edit Mode, select your stem/root vertices before clicking Apply.
Controls
Override Channel
Defaults to Red (R). Enable this only if you need to paint into a different channel for a custom shader setup.
Reverse
Flips the direction, stems become white (1) and leaves become black (0). Useful if your shader expects the opposite convention.
Falloff (default 0.7)
Controls how quickly the gradient transitions from stem to leaf.
Below 1.0 → gradient spreads fast early, stays near white for most of the mesh (leaves dominate) 1.0 → perfectly linear Above 1.0 → gradient holds dark near the stem longer, snaps to white only at the very tips For most plant foliage, values around 0.5–0.8 give a natural result where leaves are clearly white without needing a sharp hard edge.
Smooth Iters / Strength
Blurs the gradient across polygon topology after the initial calculation.
- Smooth Iterations number of passes (0 = raw, 3 is default and usually enough)
- Strength how much each pass blends toward its neighbours (0 = nothing, 1 = full average per pass) Use this to remove jagged patterns on dense leaf geometry or where topology causes uneven distance steps.
Apply Branch Gradient
Applies the vertex paint. The gradient is calculated from your currently selected vertices in Edit Mode, if you change the selection, click this again to repaint.
Typical workflow
- Enter Edit Mode on your plant mesh.
- Select the stem/root vertices/edges/faces (the base, what shouldn't be moving)
- Click Apply Branch Gradient
- Check result with Flat + R channel preview
Green Channel - Random per island
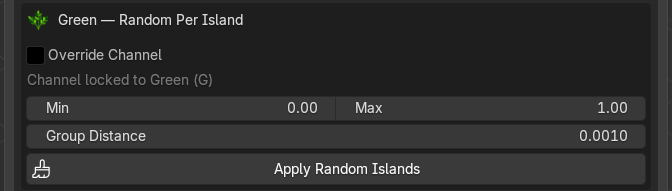
Assigns a unique random value to every disconnected mesh island, so each separate leaf geometry gets a different shade of grey. The shader reads this to give each leaf a slightly different animation offset, timing, or influence, breaking up the uniform "all leaves move identically" look.
Works in both Object Mode and Edit Mode. In Edit Mode, only selected vertices are affected.
Controls
Override Channel
Defaults to Green (G). Enable only if you need a different channel for a custom shader.
Min / Max (default 0.0 – 1.0)
The range of random values that can be assigned. Each island gets a random number somewhere between these two.
Apply Random Islands
Applies the vertex paint. A new random seed is applied, click it again for a different variation.
Typical workflow
- Select your plant meshesh in Object Mode or Edit Mode (both work)
- Check Group Distance, 0.001 (default) works for most plants where leaves touch the stem
- Click Apply Random Islands
- Preview with Flat + G channel to verify each leaf has a unique value
Blue Channel - Random per plant
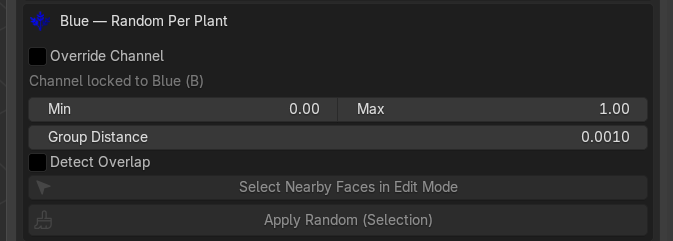
Vertex Paints a single random value onto your current face/vertex selection in Edit Mode. You need to manually select one plant at a time, click Apply Random (Selection), each click randomizes the value, you can also make use of the green channel functions here. See the tip video below
Unlike Green (which runs automatically across all islands), Blue is an intentional, per-click, artist-driven workflow.
Controls
Override Channel
Can be used to override in which channel you want to paint. Defaults to Blue (B).
Min / Max (default 0.0 – 1.0)
The range of random values that can be painted.
Narrow the range (e.g. 0.2–0.8) if you want subtle variety; keep it wide for strong differentiation.
Select Nearby Faces in Edit Mode
Helper button. In Edit Mode, select any face on one part of a plant, then click this, it expands the selection to all connected or nearby topology based on the Group Distance and Detect Overlap. This lets you quickly select a whole plant (stem + leaves together) before clicking Apply.
-
Group Distance (default 0.001) Used by Select Nearby, when expanding a selection, any island with a vertex within this world-space distance gets included in the group. Same concept as the Green Group Distance, but used here to pre-select a whole plant (leaves + stem + sub-parts) before painting.
-
Detect Overlap When enabled, Select Nearby also catches islands whose geometry penetrates or overlaps each other, useful when leaf planes clip through a stem mesh and the vertex group distances alone wouldn't merge them. Off by default; enable for dense, overlapping foliage.
Apply Random (Selection)
Paints all currently selected faces with a single new random value from [Min, Max]. Each click deliberately avoids repeating the last value, so clicking plant by plant always produces visible contrast between neighbours.
Note
It is usually best to work with strong values, so white and dark grey would sway away from each other the most, subtile values that are closer together might sway the same direction, so do keep that in mind.
Typical workflow
- Enter Edit Mode on your plant cluster mesh
- Select any face on one plant part
- Click Select Nearby Faces in Edit Mode to expand to the whole plant
- Click Apply Random (Selection), the selected plant gets a unique Blue value
- Select the next plant and so on.
Pro Tip
You can use the green channel override (set it to B) set group distance (you will have to try some values) then click apply random islands, this will randomise the process for you for a large amount, after that you turn off the override and use the B channel to manually fix the ones that are not a group.
Alpha Channel - Random per plant
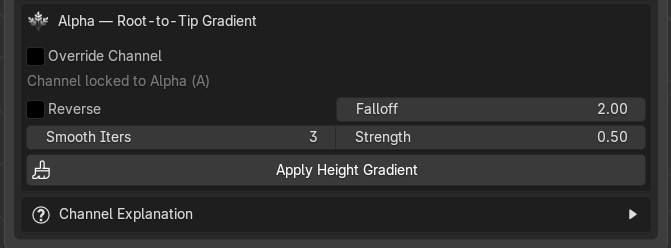
Paints a world-space height gradient across all selected objects,the lowest point of the combined selection becomes black (0) and the highest becomes white (1).
Works in both Object Mode and Edit Mode. Processes all selected meshes at once, and the gradient scale spans their combined bounding box, so multiple plants painted together share the same gradient range and look consistent relative to each other.
Controls
Override Channel
Can be used to override in which channel you want to paint. Defaults to Alpha (A).
Reverse (default off)
Flips the gradient.
Falloff (default 2.0)
Controls how the gradient transitions from base to tip.
1.0 → perfectly linear, even transition all the way up Above 1.0 → bottom stays dark longer, tip brightens sharply near the top (default 2.0 = most of the plant is low-influence, only the upper portion gets strong sway) Below 1.0 → the gradient rises quickly, most of the plant is bright For natural foliage, values around 1.5–2.5 work well, the lower trunk/stem stays anchored while the crown swings freely.
Smooth Iters / Strength
Blurs the gradient across polygon topology after calculation.
- Smooth Iters Number of passes (3 is default, usually enough)
- Strength Blend amount per pass Smoothing helps on dense meshes where height steps between adjacent faces would otherwise cause visible banding.
Apply Height Gradient (Button)
Executes the paint across all selected objects. The Z range is recalculated fresh each time from the current selection's combined bounding box.
Typical workflow
- Select all plant meshes in Object Mode that belong together (e.g. a full cluster)
- Adjust Falloff to taste, 2.0 is a good starting point
- Click Apply Height Gradient
- Preview with Flat + A channel to verify smooth transition from dark base to bright tips
- Tweak Falloff and re-apply if the transition feels too abrupt or too gradual
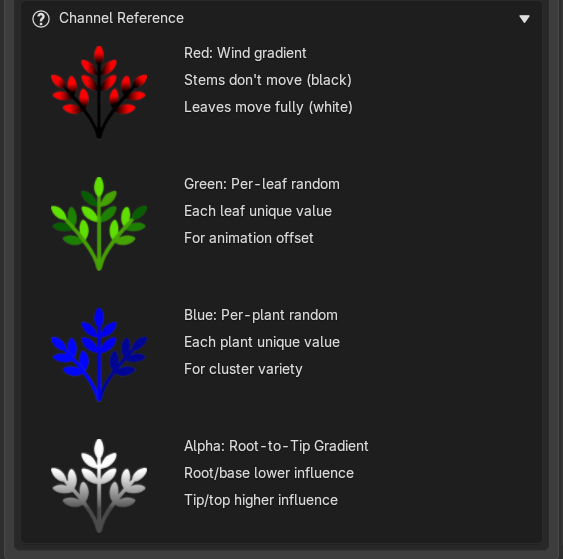
Channel Reference (A small cheat sheet)
It's a cheat sheet baked into the panel. So when you're mid-workflow and forget "wait, which channel does what again?" you can open it instead of going through the documentation.